I finally hit my 320GB limit (well almost) and didn't find any guides on the internet to help me so I am going to post the internet's only (possibly) guide with pictures on how to upgrade the Western Digital Mybook range (well I have the Pro version not Essential or Platinum or the new PRO II so don't blame me for any changes).
Note: this is a SATA drive and uses the ATA style power connector (Molex).
Firstly find the side where the button is located and you can wedge a flat screwdriver under the rubber seal to lever it off.
Once it is clear you can lever the two plastic halves of the case and you can prize open the case and slide out the half with the button and the drive attached See picture 1.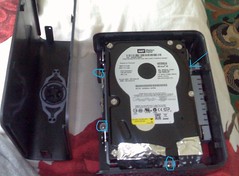
You need to remove the screws I have highlighted in blue to release the drive cage from the case. Next turn the case over and see picture 2.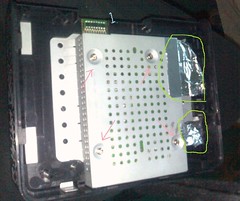
The electronics are located here, unscrew the screws in pink. Remove the Silver tape highlighted in green and notice the connector labeled 1, this is where the button board is connected which we need to remove to release both cages from the casing. See picture 3.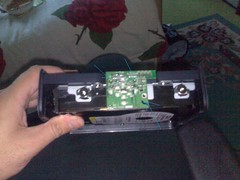
Remove the Green arrow screws and pull the board off the free the drive. Remove the big screws from the sides of the drive and replace the drive with a SATA drive and screw back together, hard part is aligning the electronics cage with the drive cage so you can screw it back on and also there is a tight screw in picture 1 which could pose a problem.
Remember to format the drive - if you want to keep it the same you need to format it as FAT32, which you will probably have to do BEFORE you put the drive in or CLONE the drives with GHOST or something I will leave you to decide.

No comments:
Post a Comment